After a hard day working out in the hot sun there is not much better than a refreshing meal that does NOT require cooking. And what meal would be complete without dessert? The following is a quick and easy take on the classic icebox cake.
The Icebox Cake
The term “Ice Box” refers to an insulated cabinet which held a block of ice and kept perishable foods cool, like our modern coolers do for a picnic or hurricane. These iceboxes were mostly in use before there was a home refrigerator in every residential kitchen.
The term “Ice Box Cake” came about in the 1930’s and referred to a cake made of chocolate wafers and whipped cream, and which did not require baking, thus keeping the house cooler. Of course, in the 1930’s most ovens were wood-burning and would heat up the whole house for the sake of a meal. But this cake was also popular with folks who wanted an easy dessert for Sunday supper. Our version uses whole grain, fruit, and cream with a minimum of sugar.
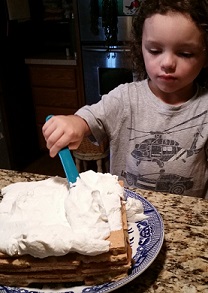
My first run-in with an icebox cake was through a home schooling journal written by Karen Andreola called “Pocketful of Pinecones”. I was home schooling my own children and wanted to see how the day-to-day of teaching children at home played out for someone else. In the book, Karen makes a simple, chilled cake for Sunday afternoon. It seemed so easy that I enlisted the help of my then four-year-old son. He loved cake and had a wonderful time playing in the kitchen with Mom and then serving cake to his Daddy and sister.
Making the Cake
You will need:
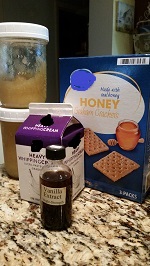
- 1 box graham crackers (or two for a taller cake),
- 32 oz. jar of unsweetened Applesauce,
- 1 pint whipping cream,
- 2 tablespoons sugar,
- 1 teaspoon vanilla extract.
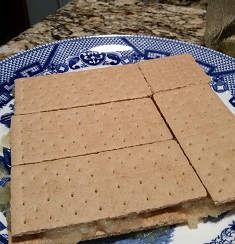
The Method: On a large, flat plate, spread 1 tablespoon of applesauce to hold the bottom layer of grahams in place. Place 4 whole and one half graham cracker in a square onto the applesauce on the plate (3 x 3). Spread a layer of applesauce on the grahams, going all the way to the edges. Add another layer of grahams but alternate their direction so the “cracks” between them are not directly on top of the ones below. This will keep the “cake” from sliding. Repeat until cake is the desired height, leaving off the applesauce on the very top layer
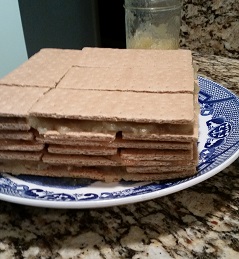
so the “frosting” will stick. For older children you could easily turn this into a math lesson on multiplication or even cubing exponents.
Directions: Into a large, chilled mixing bowl, pour the cream, sugar and vanilla extract. Whip on high with electric mixer until soft-stiff peaks form for whipped cream icing. Spread this whipped cream over the whole graham cracker/applesauce cube, even the sides. Place the cake in the refrigerator for at least one hour or overnight.
Variations
There are many varied and delicious substitutions that can be made when assembling an icebox cake. These could be made individual size or just two crackers wide. I could use cinnamon grahams for a spice cake. Chocolate graham crackers may be swapped in for the plain grahams. Pudding (instant or cooked) may be used instead of the applesauce. Pudding varieties could be chocolate, vanilla, pistachio, lemon, and even Key Lime pudding. I’ve been wanting to try a filling of crushed pineapple, or peach applesauce, or plum butter instead of plain applesauce.
I could even tinker with the whipped cream icing by adding some cocoa powder or peanut butter during the whipping process. Maple syrup, honey, agave nectar, or coconut sugar may be used instead of the sugar in the whipping cream. Substitute lemon, orange, or almond extract for the vanilla extract flavoring the whipped cream. Could it be possible to make an “Orange-Dream-cicle” icebox cake?

After seeing a similar recipe in a magazine, I once took this cake as “Key-lime Icebox Cake” to a pot-luck luncheon where everyone thought I had worked hard to get my cake layers so very thin and even. It was a huge success.
You, too, can make this simple cake. And even the youngest children could have a fun learning experience with the assembly of the layers and “frosting” for an edible math lesson. Decorations can be added but are not necessary.
There are myriad recipes out there for Icebox Cakes with ingredients ranging from simple to glam, healthy to oh-so-decadently not healthy! By following the basic steps outlined above, you can tailor the ingredients to your families preferences and get creative with your children in the summer kitchen without involving the heat of an oven.
 0
0
