There are numerous methods for slicing a fresh mango. Ripe mangoes can be slippery and messy when cut. Unripe mangoes pose the opposite problem, not messy but usually so hard that cutting into them may be hazardous to your fingers. And the curvy fruit does not like to sit flat for easy slicing. For this reason I like to set up my mango slicing station right next to the kitchen sink for frequent hand rinsing. And keep a dry towel nearby. This helps with griping the fruit sufficiently for safe cutting.
But if you’ve never seen a mango seed, it may be difficult to know exactly what you are dissecting. The following photos of an average size Mango will show you step-by-step how to slice and give you an idea of the innards of the fruit.
I like to slice a washed and dried fresh mango with little wasted fruit and no trips to the emergency room. And my hands smell like mango all day.
Supplies Needed
- Mangoes
- Very sharp, paring knife with a 4” to 5” blade
- Cutting board
- Dry towel
- Bowl for cut fruit
- Kitchen sink
Step 1
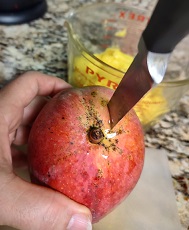
Usually, a mango has a stem end and a sharper “pointy” end. Near that pointed end there is usually a faint line on one side heading toward the stem end. This is the mid-line which corresponds to the thin edge of the pit inside. If you are right-handed, grip the mango firmly with your left hand, stem end up, with this mid-line toward you. Keep your fingers completely on the left side of the fruit while you position your sharp knife about ¼-inch to the right of that stem scar. Slowly slice straight down, slightly curving around the hard pit as you feel the seed edge inside with the knife. This should remove 1 mango “cheek”. Slicing down from the stem end also keeps the knife going with-the-grain of any seed hairs. If you are a “lefty”, reverse the hand instructions above.

Step 2
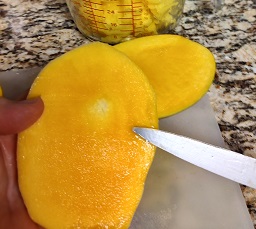
If your hands are slippery from the first slice, rinse and dry them. Stand the mango up again and turn it so you can slice off the other cheek, again ¼-inch to the right of the stem. This time, keep your fingers on that half-inch sliver around the middle of the fruit but away from the knife as it slices past the pit. This should leave you with 2 mango “cheeks” and the pit with a thin band of fruit and the skin on it.
Step 3
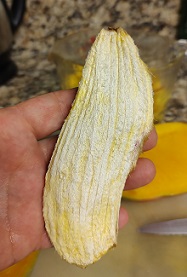
If your hands are slippery, rinse and dry them again. Holding the mango seed section, remove the skin from all the way around it in a paring motion. Discard the skin. If that paring motion scares you, you may set the section down flat and remove the skin that way.
Now you have 2 choices with the pit: Cut away the remaining flesh from the seed and add it to your bowl; or stand over the sink and use your teeth to enjoy the fruit off the seed. You will get messy, it’s alright. Their will be a fuzzy section on the seed which likes to hold on to the fruit. If you find it, using your teeth to remove the fruit from the fuzz is great dental floss.
You may wish to completely wash all the bits of fruit off the pit to dry it and save the seed for planting. But that’s another story.
Step 4
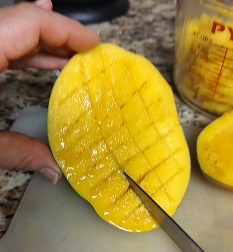
Set the mango “cheek” which you cut off the seed, cut-side-up on your cutting board. Now your are going to cut a grid pattern into the fruit without cutting through the skin underneath. Score through several times in one direction, moving your knife over 1/3-inch to ½-inch with each slice. Then rotate the mango 90° and slice again in the same manner, trying not to slice the skin underneath.
Pick up the cross-hatched mango cheek and push on the center of the skin-side from the

outside, popping the fruit cubes up. You can remove these with a spoon or just slice them off the skin with your knife right into the bowl. Discard the empty skin. Repeat with the second mango cheek.
Methods and Videos
This method of slicing a mango has worked the best for me and is the least dangerous to my fingers. With the rinsing and drying of hands between steps, it is easier to hold the fruit steady.
During my research for this blog, I found MANY mango slicing tutorials on Youtube. But I found that Alton Brown’s mango slicing video was the most entertaining.
If you would like to learn more about growing a mango tree in your Florida landscape, there is a publication by the University of Florida’s Institute of Food and Agricultural Sciences Electronic Data Information Source (UF/IFAS EDIS), “Mango Growing in the Florida Home Landscape”. At the end of the publication, after downloading, there is a table listing varieties, the months they fruit, and the size of the fruits each produces. Amazingly, mango fruits can range from about 10 ounces up to 40 ounces!
UF/IFAS St. Lucie County Extension’s Natural Resources Agent, Ken Gioeli, has also written a blog entitled, “This is how I cut a Fresh from Florida mango!” if you would like to see his variation.
For ideas on how to use mangoes, another UF/IFAS Extension Indian River County blog, “Mangoes in Florida“, has 2 recipes and a couple more ideas for which to use mangoes. Enjoy and slice safely!
 2
2
