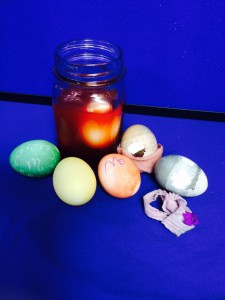
This time of year, many children are egg-cited to dye Easter Eggs! This year, instead of buying a kit to dye eggs, why not use natural materials that you most likely already have in your kitchen or yard? One 4-H Junior Master Gardener Project teaches young gardeners how to make dyes made from plant parts and other natural materials and teach a little science at the same time.
Start by cleaning the eggs by wiping them with vinegar. Why vinegar? Well there is a little science behind that…and a great teachable moment! The shell is protected by a thin layer of protein molecules called the cuticle. This cuticle has a neutral charge so not much is attracted to it. The vinegar contains acetic acid, which reacts to make the cuticle positively charged. The dye typically has a negative charge. So to get the dye to “stick” to the egg, the positive charge on the cuticle attracts the negative charge of the dye. (Use a magnet as a visual example.) Therefore the acid is needed to make the color adhere to the shell. FYI! If the egg is left in the acid it will make the shell disappear. (A great experiment for another day)
Back to dyes…Talk to youth about how early Americans made their own dyes. Look around your house to see what might make a good dye and predict what color it will make setting up your own mini science experiment. To make your dyes mix 1-4 cups of plant material or 2 to 4 tablespoons of ground herbs or spices with 1-2 quarts of water in a pot. Bring the mixture to a boil, turn off and steep until cool. Strain, keep liquid and discard plant materials. Juices can be used as is. Soak eggs in the liquid/juice dyes + 1 teaspoon of vinegar – the longer soaked the brighter. If soaking eggs for extended periods, store eggs with dye in the refrigerator. Easter eggs are safe if handled properly. They must not be out of the refrigerator for more than 2 hours.
Ideas for dyes:
- Blue to Purple– grape juice, red grapes, blueberries, red cabbage, blackberries
- Reddish Pink Purple– paprika, red onion skins; beets/beet juice, Cranberries, Hibiscus Flowers, Red teas (Passion, Hibiscus)
- Brown– coffee, black tea
- Golden Orange– yellow onion skins
- Orange– turmeric, ground cumin, yellow onionskins plus beet juice, paprika Green– spinach, kale, parsley, carrot tops.
- Yellow– curry powder, orange and lemon peels, Safflower Petals
For cool effects before cooking/dyeing:
- Draw on your egg with crayons
- Wrap your egg with rubber bands or yarn for a tie-dyed effect
- For a marbled effect, put 1 Tbsp oil in the dye before dropping your egg in
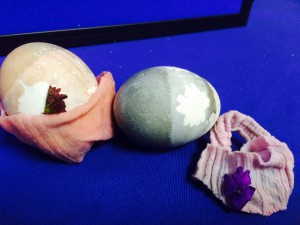
- Stamp your eggs with nature images by placing a leaf or flower on your egg, then wrapping it tightly with a piece of nylon stocking. Dip into dye. When you remove your egg from the dye, carefully remove wrappings.

Use leaves or flowers to make interesting prints on your eggs.
Cool effects after cooking/dyeing:
- Sprinkle with salt while still wet and see what pattern emerges!
- For a mottled egg, rub/pat it with paper towel as soon as you remove it from the dye
- Draw with markers when your egg is dry
- To make your eggs gleam, rub vegetable oil on egg after cooled and dried.
These and other activities are part of 4-H, one of the nation’s most diverse organizations. 4-H includes people from all economic, racial, social, political, and geographic categories. There are no barriers to participation by any young person. Participants are given the opportunity to engage in activities that hold their personal interest, while being guided by caring and trained adult volunteers. For more information about joining 4-H as a youth or volunteer, contact your local UF/IFAS Extension Office or visit http://florida4h.org.
 0
0

