Build Your Own Sub-Irrigated Planter!
What is a sub-irrigated planter?
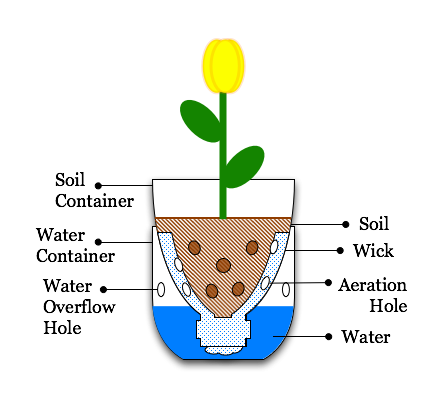
It’s a unique type of growing container that uses a different method for watering plants. Instead of watering the plant from the top, the water is stored in a reservoir and pulled upwards from the bottom through capillary action. This allows you to be more efficient with your water and can help keep your plants healthier as well. I also allows you to garden without the need for a large space.
Materials List:
Two 5 gallon food grade buckets
1″ outer diameter PVC pipe
4″ perforated drain pipe
Potting soil
Drill with 1/4″ drill bit, 1″ hole saw, and 4″ hole saw
13 gallon trash bag (optional)
Bungee cord (optional)
Assembly:
- Designate one bucket as your upper bucket and one as your lower bucket.
- Upper bucket:
- Cut a 4″ diameter hole in the center of the floor of the bucket. (This is where your wick will go)
- Cut a 1″ diameter hole near the edge of the floor of the bucket. (This is for your fill tube)
- Drill 20-30 1/4″ holes evenly spaced around the other holes. (These are for additional drainage)
- Lower bucket:
- Seat the upper bucket inside the lower bucket. Then drill a 1/4″ hole just below the bottom of where the upper bucket stops. (This will act as your overflow hole)
- Cut a 45 degree angle at one end of your PVC pipe and insert the cut end through the 1″ hole in the upper bucket. The pipe should stick up a few inches above the top of the upper bucket.
- Insert the perforated drain pipe into the 4″ hole in the upper bucket. The pipe should stick up a few inches above the floor of the upper bucket.
- Fill the wick with potting soil and then continue to fill the remainder of the bucket with soil.
- Optional step: Place the plastic bag over the top of the bucket and use the bungee cord to attach. (This will help with moisture retention and weed control)
Care:
As with any vegetable garden, you’ll still need plenty of sunlight and a consistent water source. For more information on vegetable gardening in Florida, consider some of these resources.
Florida Vegetable Gardening Guide: http://edis.ifas.ufl.edu/pdffiles/VH/VH02100.pdf
Herbs in the Florida Garden: http://edis.ifas.ufl.edu/pdffiles/vh/vh02000.pdf
Specific Vegetables A-Z: http://edis.ifas.ufl.edu/topic_vegetables_a_thru_z
Seeding the Garden: http://edis.ifas.ufl.edu/pdffiles/VH/VH02600.pdf
Starting the Garden with Transplants: http://edis.ifas.ufl.edu/pdffiles/VH/VH02700.pdf
 0
0
