In the world of agriculture, water is a precious resource that needs to be used efficiently and sustainably. With increasing concerns about water quality, quantity, and the need for improved irrigation practices, farmers and agricultural extension agents are constantly searching for innovative ways to optimize their irrigation systems. One such method that has proven invaluable in improving water and nutrient management in the Suwannee Valley Region is using blue dye to visualize how water moves in the soil.

Blue dye testing is a simple, yet effective technique that has been conducted by UF/IFAS Extension agents and specialists over the past twenty-five years! This test is used to visualize water movement in soil by injecting a water-soluble blue dye into the irrigation system and later digging an observation hole in the soil, which allows for tracking the spread and depth of water beneath the surface. This method helps farmers assess how irrigation water moves into or beyond the root zone, especially in mulched or raised beds where water movement is otherwise difficult to observe. By observing where the dye moves and where it doesn’t, farmers can identify areas of concern, such as uneven water distribution, clogged irrigation lines, or areas where water isn’t reaching at all. Through analyzing these dye patterns, farmers can optimize irrigation scheduling and improve water and nutrient management, leading to more efficient crop production.
Procedures for Conducting a Blue Dye Test
Before the Dye Test
- Prepare the field and form the beds as would typically be done for vegetable production.
- Isolate a section of the field where the dye test will be performed.
- Connect the water source to the section of the field where the dye test will be performed.
- Prepare an injection point for the dye using a small transfer pump.
- Select a water-soluble dye.
- Mark bed sections 30 to 50 feet in length. Sections may be marked with flags or paint.
Day of the Dye Test
- Bring a stopwatch, data collection form and pen, a knife, a tape measure, shovels, and a 5-gallon bucket.
- Turn on the water and pressurize the system.
- Start injecting dye once the system has been charged.
- Disconnect the injection point to allow drip irrigation system to operate normally.
-
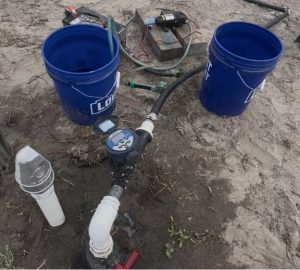
Pump and bucket set up for a blue dye test at NFREC-SV. (photo credit: Kelly Aue) At pre-selected times, use cut off valves to turn off the tapes at pre-marked spots to allow different times of irrigation after the dye is injected.
After the Dye Test
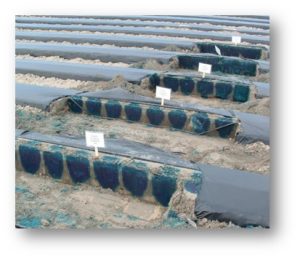
- For each section, dig a transverse (perpendicular to the bed axis) and a 4-foot longitudinal (parallel to the bed axis) section.
- Measure and record the position of the waterfront for each visible emitter.
Visit “Table 1. Step-by-step operations needed to conduct an on-farm dye test.” on the document linked below for more detailed procedure information.
Lessons Learned Through On-Farm Demonstrations
Blue dye demonstrations have provided valuable insights into irrigation and fertigation management. Early in the season, the risk of leaching is highest, and blue dye tests have often resulted in irrigation events being reduced by 50% to avoid unnecessary water and nutrient loss. In the mid-season, blue dye testing helps refine irrigation practices to maintain proper moisture without leaching. By late season, the crops’ deeper root systems reduce the risk of over-irrigation.
Throughout the years, UF/IFAS Extension agents and specialists have conducted more than 40 on-farm blue dye demonstrations across 12 counties, showcasing a variety of vegetable crops including watermelon, cantaloupe, tomatoes, peppers, squash, spinach, and more, as well as fruit crops such as blueberries and various fruit trees.
In the early years of these demonstrations (15-25 years ago), it wasn’t uncommon to see irrigation times cut by more than half, especially in the beginning of the growing season. These demonstrations, along with soil moisture monitoring tools, helped early adopting farmers reduce their irrigation by at least one hour per day over a 50-day period during the first half of the season.
Over the past two decades, many of the farmers in the Suwannee Valley have permanently adopted these reduced irrigation practices. Today, it’s rare to see excessively long irrigation events, thanks to the lasting impacts of the blue dye demonstrations. For instance, reducing irrigation by just one hour per day on a typical watermelon farm saves 1,620 gallons of water per acre each day. Over the course of 50 days, a 200-acre watermelon farm would save over 16 million gallons of water in a season! It is estimated that similar water saving practices have been implemented on more than 10,000 acres of vegetable crops in the Sunshine State.
Blue dye testing is a proven tool for demonstrating efficient irrigation management, offering clear evidence of its effectiveness. As the saying goes, “The Blue Dye, Don’t Lie!”—a testament to its reliability in optimizing irrigation practices.
Utilizing Blue Dye to Visualize Drip Irrigation Efficiency and Nutrient Leaching in Sandy Soils – “The Blue Dye Don’t Lie”!
Authors: Sydney Williams, Bob Hochmuth, and Taite Miller
University of Florida, Institute of Food and Agricultural Sciences
North Florida Research and Education Center- Suwannee Valley
7580 County Road 136 Live Oak, FL 32060
 8
8
