Ask Master Gardener Volunteer Linda Clemens
![]()
![]()
Potato (Solanum tuberosum)
One of the first crops planted in the north Florida vegetable garden in the New Year is the potato, also known as the “Irish potato” to differentiate it from the
sweet potato. As I learned from my gardening co-workers when I moved here in the mid-1980’s, the proper time to plant potatoes in this area is Valentine’s Day. With luck and good weather conditions, you should be eating your first new potatoes in about 10 weeks.

Potatoes are primarily a cool weather crop. Although the foliage can be killed by frosts or freezes, hot weather will bring a variety of pests and diseases that will diminish your yield or kill your plants. It is best to take your chances with the weather and plant potatoes early in the growing season.
Potatoes are members of the large and important Solanaceae or nightshade family, which also includes tomatoes, peppers, eggplant, garden huckleberry and deadly nightshade. A garden curiosity is the “pomato”, which is a plant produced by grafting together a tomato and potato plant. Cherry tomatoes grow above the ground while potatoes grow below. (As an aside, Gladys Mitchel published an excellent horticultural mystery novel in 1959. “The Man Who Grew Tomatoes,” has a fiendish plot that turns on the ease with which members of the nightshade family can be grafted on one another).
Seed Potatoes
Potatoes are usually grown from a “seed potato,” which is a piece of a mature potato. New plants grow from the “eyes” in the potato. Local sources for seed potatoes include hardware, feed and garden supply stores. You will have better success if you grow potato varieties suitable to our climate and local stores generally carry varieties that do well here. I have grown Red LaSoda, Yukon Gold and Kennebec white potatoes very successfully in my Wakulla garden. Start looking for seed potatoes in stores around the middle of January.
How to Plant Potatoes
The place to start is with your soil. Potatoes grow best in a loose, well-drained slightly acidic soil, with a pH range of 5 to 6. Potato plants die with too much moisture around the roots, so make sure you plant where the soil drains well. Potatoes can also be grown successfully in containers, but once again, make sure that the container drains well. We grow our potatoes in a trench filled with compost and other organic material, mixed with a little granular sulfur since our soil pH is high. Potato plants are heavy feeders and IFAS recommends mixing fertilizer into the soil at planting.
Once your soil is prepared, it is time to plant the potatoes. Cut your seed potatoes so that each piece is about the size of an egg, with one or more “eyes” per piece. One pound of potatoes makes about six to eight seed pieces, which will plant about 5 feet of row. It is recommended by many authorities that you leave the cut pieces in a dark, humid, well-ventilated place at around 60° F for one or two days before planting, but we generally skip this step. Rows should be spaced at least three feet apart, with seed pieces about six to eight inches apart. Bury seeds about 4 inches deep, with the eyes facing up.
Growing Potatoes
As the potato plants sprout and grow, you will need to pay attention to the following:
- Hilling – This is important. Because the potato seeds are planted so close to the surface, some of the forming potatoes may actually push out of the soil where the light from the sun will turn them green. Potatoes that turn green should never be eaten, since they have a relatively high concentration of a toxic substance, solanine, which forms when potato tubers are exposed to light. To prevent this from occurring, heap soil over the plants as they grow.
- Fertilizer – A second application of fertilizer should be applied about three to four weeks after planting. Apply the fertilizer 4 to 6 inches on either side of the plant row and gently hoe it in.
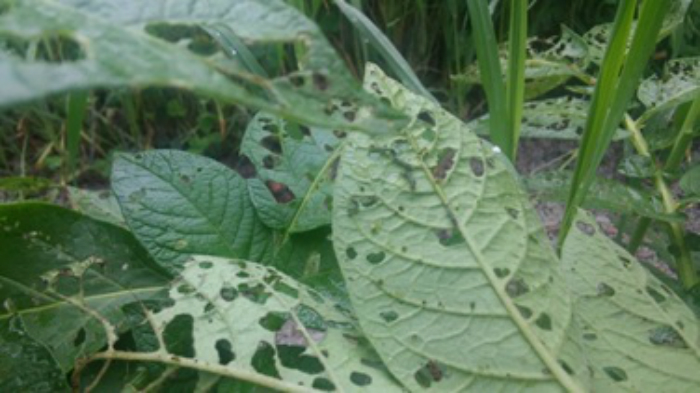
Photo by: Linda Clemens – Caterpillar damage on potoato leaves - Irrigation – Depending on weather conditions, you may need to supply extra water to your plants.
- Frost Protection – Since you are planting in February, there will probably be some cold weather. Make sure you have some pine straw mulch or row cover to protect your new plants. Loose soil can be heaped up over small plants. Potato plants can take some frost damage without affecting production, but they will die if frozen.
- Pests and Diseases — Caterpillars seem to be our most common pest. Inspect the plants often and use BT (Thuricide) or chemical pesticide as needed. One way to minimize the potential for disease is to avoid planting potatoes where you have planted potatoes, tomatoes or other nightshade family vegetables the previous year. We like to rotate vegetable crops in our garden on a four-year schedule.
Harvest
You can probably start harvesting new potatoes once the plants bloom. I usually carefully feel under my more robust plants and “borrow” one or two from each once the potatoes reach golf-ball size. We dig the potatoes as needed through the rest of the growing season, balancing the tastiness of tiny new potatoes with the desire to grow some really big potatoes for storage. We usually end up eating about half of our 50 foot row as new potatoes and digging the rest when the plants die back in early June. The preferred tool for digging potatoes is the potato fork; a short-handled, four-prong garden fork.
When you dig your potatoes, there will be the remains of the potato plant, and often, the piece of seed potato that started the plant. Profit from my experience, and carefully dispose of the remains. I used to place the old plants and seed potato pieces in my compost pile for disposal. One year, my very greedy Labrador retriever, Rosie, ate her fill of green seed potatoes pieces and almost died. Now those items are bagged and go right into the garbage can.
For storage, allow your mature potato tubers to dry out in a cool, dark, well ventilated place for a couple of weeks. Do not refrigerate potatoes – the cold temperatures will cause undesirable changes in flavor and texture. We store our potato harvest in an open basket in our pantry closet, away from the light, where they will generally last for two to three months if we don’t eat them first.
See IFAS publication “Growing Potatoes in the Florida Home Garden” at https://edis.ifas.ufl.edu/hs183 for more information about potato varieties, cultivation and fertilizer requirements.
If you have any questions or suggestions for future articles please email to wakullamg@ifas.ufl.edu
![]()
Follow Us
![]()
Follow Us
| The Institute of Food and Agricultural Sciences (IFAS) is an Equal Opportunity Institution authorized to provide research, educational information, and other services only to individuals and institutions that function with non-discrimination with respect to race, creed, color, religion, age, disability, sex, sexual orientation, marital status, national origin, political opinions, or affiliations. U.S. Department of Agriculture, Cooperative Extension Service, University of Florida, IFAS, Florida A&M University Cooperative Extension Program, and Boards of County Commissioners Cooperating |
 0
0
