Intended Audience:
WEB MODERATORS
TIP: When working with a significant amount of media, use the TERMINALFOUR (T4) bulk upload feature. Below are more details on how the T4 bulk upload works, along with a continuation of my original post here.
How T4 Bulk Upload Works
You can use a single .zip file to add media files to the TERMINALFOUR (T4) media library. In short, a single zip file is converted to a Media Archive Package. Then the Package is imported into T4. Finally, all imported files are added to a selected Media Category (folder) in the Media Library, where:
- The folder structure within the .zip file becomes the Media Category structure in the Media Library.
- Each file in the .zip becomes a Media Item.
- The file name is used as the Media Item name in TERMINALFOUR.
PRO-TIP: The description (and all other metadata) is not imported and is left blank. So, you will need to provide new descriptions or ALT tag information for each media item in the .zip file.
T4 Media Types Drive The T4 Bulk Upload
What I recently discovered was that T4 Media Types drive the T4 Bulk Upload. Here is a list of common Media Types:
- Image (.jpg, .jpeg, .png, .gif)
- Microsoft Office Document (Word, Excel, PowerPoint)
- Adobe PDF Document (.pdf)
Plan Ahead
There are two ways to organize media when preparing your .zip file for upload:
| Method Types | Approach |
| Same.zip | Using this method, you will upload several .zip files by Media Type (i.e., Image, Microsoft Office Document, Adobe PDF Document ). In this manner, you will prepare files for upload: unit-images.zip, unit-docs.zip, and unit-pdf.zip. In the unit-images.zip, all files must have an image file extension (e.g., .jpg, .png, .gif); otherwise, they are excluded from the T4 upload and import process. |
| Mixed.zip | You can organize media into a single .zip file containing different T4 media types (e.g., unit-mixedtypes.zip). In this example, the .zip file may contain files with various extensions (.jpg, doc, .pdf). Using this method, you will need to upload the same .zip file but choose a different T4 Media Type each time. |
After trying both methods, I prefer using common media types organized into multiple .zip files when bulk uploading. Remember, using the mixed bulk upload option (as shown in my example below) will only extract and import media for the selected Media Type. We will discuss this later, but here is a screenshot showing the Media Type option in T4.

Preparing Your Files For Bulk Upload
Both the Same and Mixed type methods will require some file organization to stay sane. This video tutorial shows you how and why creating folders, aka categories, within the T4 media library is the way to go.
Media Categories = Media Folders
Every time you create a subfolder in the T4 Media Library, you create a category. See screenshot. Media categories follow the folder structure.
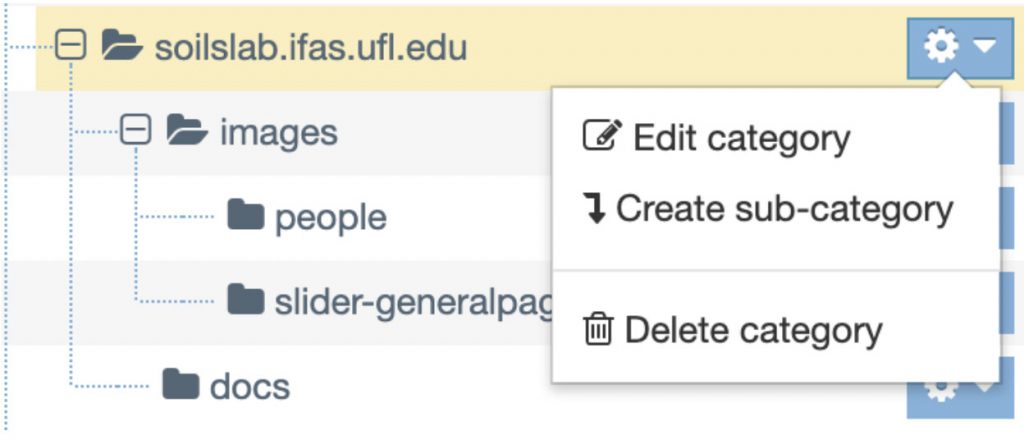
If you intend to upload a .zip file containing 100s of media items, you will need to create a folder structure within it. Please take a look at the folder and file structure below. Here is an example with orange representing the primary .zip file, blue representing folders, and green representing files:
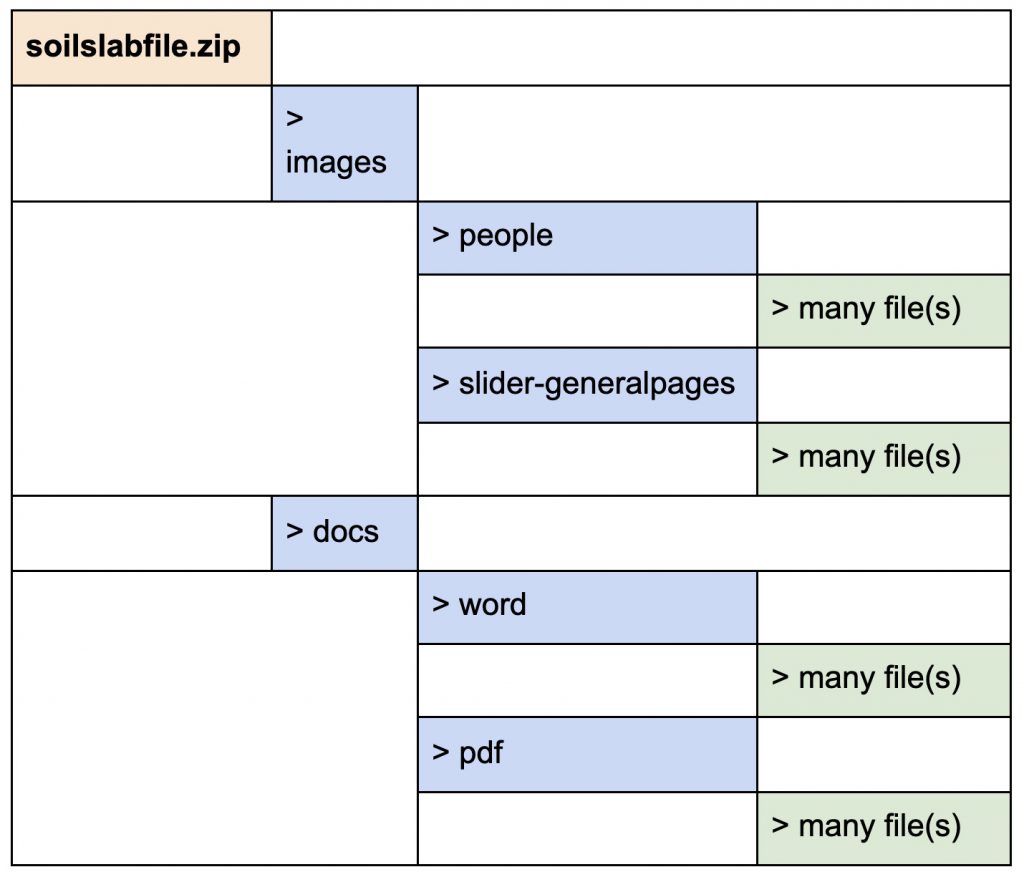
PRO-TIP: It is better to separate files into folders in the T4 media library. The more items added to a folder or category, the longer it takes to load, see, and use the media in that folder. So, adding subcategories to the T4 media library decreases the time it takes to use a media file and find one.
Media Names
You are now ready to upload your .zip file and create the package in T4. But before you do, be sure that your .zip file and the folders and files within it have meaningful names. Remember, the file name is used as the Media Item name in TERMINALFOUR. And, you don’t want to spend time trying to figure out what each Untitled.doc file is all about.
For this demonstration, I will use a single .zip file during the bulk upload process. But the following steps will help with both the Same and Mixed method approaches discussed above.
Bulk Uploading And Converting .zip Files Into A T4 Package
To create, convert, and import a single .zip file into a Media Archive Package, go to Content > Content Migration > Packages.

From the Packages Screen, select “Create new package,” then select the Type of Media Archive and click Next.


You will be asked to enter the following details, which I’ve included below. Remember, the more descriptive the information is, the quicker you can locate the package and contents after upload.

The Package Details screen contains a lot of information. I have included a screenshot of what’s essential below. But for the daring: Take a peek at the lower half of the Package details screen (not shown below), and you should see information about the uploaded Package, including the files you included in your .zip file. The bottom page details also show warnings and errors related to the created Package.

Ok, now back to bulk uploading. Select Next and then click Finish. Depending on the size of the file, eventually, you will see a message that says, “Your package has been created.” Click Finish.

After clicking Finish, you will land on the Managed Package screen. Since we all share the T4 Media Library, you will need to search for your uploaded package. This is where having and remembering the name of your .zip file becomes essential. Use the Filter box to locate your file. See the screenshot below.

PRO-TIP: To avoid a failed upload or an Error when creating the Package, remove special characters from your file and folder names.
Success! The Package has been created and is listed as “Pending,” and is now ready to Import.
Now, we need to move the files from the created Package into a T4 Media folder. Select Import from the Actions menu:

While importing, T4 will prompt you to specify where you want to add the media files in your .zip package. First, find and choose your media folder.


Generally, your media folder is named the same as your website. For example, in the screenshot above, I am adding my files to a TEN TEST folder under the main programs.ifas.ufl.edu media folder.
If your files have been successfully moved to your media folder, you should see the following message: “Your package has been imported.”
Now, you can go to your media folder and check. Here we go! I navigated to the following path in the T4 media library, and I can see my .zip file package imported by name.

Let’s take a look at what you get under the + sign.

I can see the image is present in my T4 media folder…

If you want, you can stop here.
But remember what I said earlier: using the mixed bulk upload option will only extract and import media indicated by the selected Media Type. Here’s a peek at my .zip file. Notice, I have three files of 3 different types.

Remember, the T4 bulk upload is driven by Media Type, and when I uploaded the first time, I selected Media Type > Image. So, T4 only added the .jpg file to the media library.
Let’s try adding the .zip file again, but change the Media Type. See the screenshot below.

PRO-TIP: If you upload the same .zip file to extract new files, you will need to provide a new folder name. Take a look at the changed name in the screenshot above.
Here is my result after re-importing; the only Media added from the .zip file is the .docx of Media Type: Microsoft Office Document.

Do you want one more pro-tip? If you want to remove what you imported into the Media Library using the Bulk upload option, you can just find your created package and choose Actions > Rollback Package.
PRO-TIP: If you want to remove what you imported into the Media Library using the Bulk upload option, find your created package and choose Actions > Rollback Package.

Try both Bulk Upload options. Which do you like best, the Same or Mixed type?
 0
0