
Among the variety of questions that come to Extension from time to time there is usually one that asks the best time to plant a tree. Once when the question was posed, I heard this very direct and accurate answer – “The best time to plant a tree? 5 years ago”. As it is, March is actually a very good time to plant a tree because about the time one begins to get really tired of the watering routine the June rains begin. Water is a critical element in getting trees off to a good start, but there are several other factors that must be taken care of if trees are to do well. There is a lot more to it than simply digging a hole and throwing the tree in.
Tree Location
Before doing anything, determine where the tree will be planted. What type of soils exist on the site? Some trees do better in dry, sandy soils than others. A few, magnolia for example, will not tolerate flooding. Even standing water for one or two days can kill them. Check for overhead power lines and underground utilities. Consider whether there is a sidewalk, drain field or driveway that might be impacted by shallow roots. Trees drop leaves, nuts and small branches – will this become an annoyance or a lot of additional work? Are there shade benefits that might help reduce summer cooling bills? You will need to evaluate the angle of the summer sun to select the optimal site if lower cooling bills are your goal.
Tree Selection
The job of getting a tree that will be a good tree 10 or 20 years from now actually begins at the nursery. Make sure you buy from a firm that understands quality and that is committed to producing trees with good structure. Select a tree that has one dominant central leader. Look for taper in the trunk of the tree so that the base is proportionally wide and narrowing at the top of the tree.
Next check branch attachment. Avoid trees that have an upright attachment with an angle that is less than 30 degrees between the branch and trunk. Instead look for branches that are at an angle greater than 30 degrees as these have a stronger attachment to the trunk. Walk around the tree to be sure the crown is full and uniform. Leaves should be a healthy color and free of disease spots.
Next check the root ball; you should be able to see a slight flare at the base of the trunk and often the top of one of the roots. Soil in the root ball should be compact enough to hold the root ball together if the pot is removed. Avoid trees that have extensive, circling roots and little evidence of soil. Be willing to pay a little more for a good quality tree – you will be investing years growing the tree in your yard and defects are hard to overcome, even in time.
Planting Your Trees
Once you get the tree home prepare the hole and get the tree planted right away. The hole should be slightly shallower than the top surface of the root ball and twice as wide. Pay particular attention to this step – do not plant the tree too deep. Insure the surface of the root ball is an inch or so higher than the surrounding soil. Remove the container and proceed to break roots apart to insure they will grow out, in a radial pattern away from the tree rather than continuing in a circular pattern. Backfill the hole with whatever material came out of it; avoid the temptation to add peat moss, compost or other amendments – the tree will need to survive on whatever soil is there.
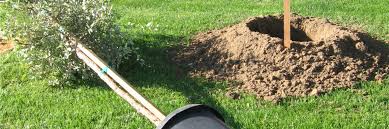
Pat the soil firmly in place – but do not overly compact when backfilling. Use any excess soil to form a berm that is 8 – 12 inches high, about three feet out from the trunk, completely encircling the tree. Using a garden hose set on medium outflow, force the end of the hose into the newly compacted soil at several points around the base of the tree to remove air pockets. Allow the water to fill the pool to the top of the berm, then turn the hose off. The next day, you may need to backfill areas of the root ball installation that have washed through. Fill the berm once again with water, then turn the hose off and let the water seep through. Repeat this practice daily for the first two weeks, then water every other day for the next three weeks.
At this point you may move the water cycle to two times a week, 3 or 4 days apart, until the June rains begin. Monitor summer rains to insure the tree is getting at least a quarter inch of water every couple days. Do not allow the tree to become stressed due to lack of water.
After trees have been planted 60 days lightly fertilize around the surface of the bermed area using a granular, slow-release 15-0-15 fertilizer. Be conscious of the weather during the establishment period, particularly for the first year, and supplement water if we encounter a dry period of several days with no rain, particularly when temperatures are hot.
Quality trees add value to property, but remember that quality won’t just happen. Selection, proper planting and attention to the tree for several years after planting will be necessary to get the most from your investment.
 0
0
